Voice Vlan via OUI method
This howto is a step by step guide showing just how to create a Voice Vlan on a Zyxel GS1900 switch using the OUI(OEM Unique Identifier) of the IP phones. The switch ports will be dynamically configured to pass tagged Voice Vlan traffic when a MAC address of an IP phone is detected. This is done by matching the first 3 bytes of the MAC address against the OUI table in the switch.
Furthermore we will show you how to enable and configure LLDP as to advertise the existence of a Voice Vlan to the connected IP phones. For this example Vlan 1 is the default Untagged Vlan and Vlan 2 is the tagged Vlan for voice traffic. Port 1 of the switch is the trunk port and ports 2-10 are for phones, PCs or Laptops.
To create a Voice Vlan you first have to create the Vlan itself (Vlan 2): Configuration->Vlan
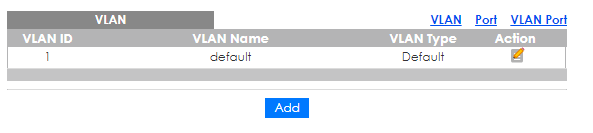
Click on the add button then:
Enter the Vlan number and a prefix name then click on Apply.

Notice that the prefix name is prepended to the Vlan number to create the new VLAN Name.
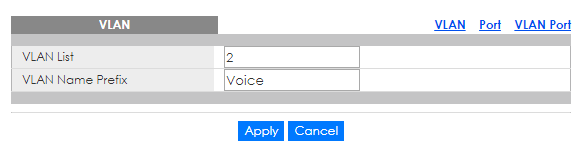
Now that we have the new Vlan created let’s make it a tagged Vlan on our trunk port, Port 1.
->VLAN Port
Choose Vlan 2 from the drop down, then click on the Tagged bubble for Port 1, then click Apply.
Do not apply Vlan 2 tagging to any other ports!!!
Create the Voice Vlan: Configuration->Voice Vlan
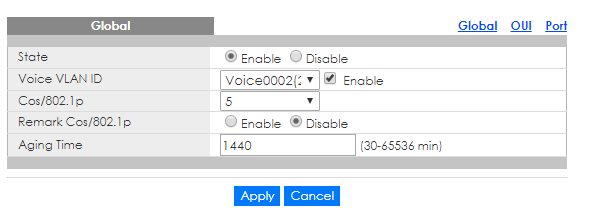
Click on the enable bubble then choose the Vlan you just created from the drop down and enable it, if you only have one other Vlan besides Vlan 1 then that vlan will be your only choice. Click Apply!
Next we want to choose which ports that we want apply the OUI method of tagging for Vlan 2.
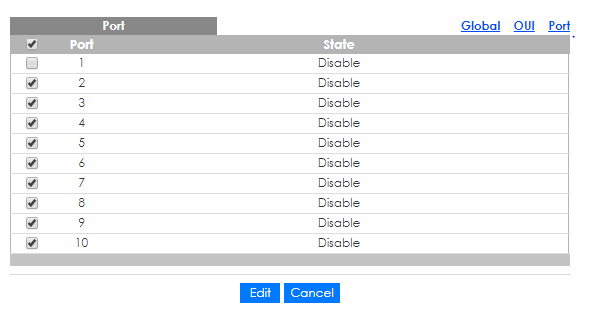
Click on the Port tab then select all ports except your trunk port which we tagged previously for Vlan 2 traffic then click on the Edit button.
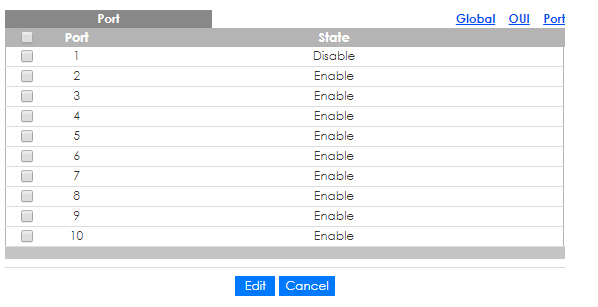
Click on the enable button then click on Apply. Your screen should show all ports except your trunk port enabled for the Voice Vlan.
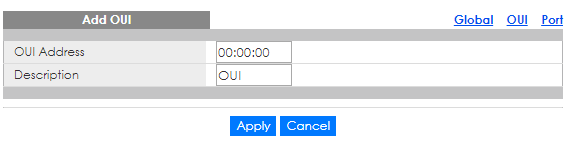
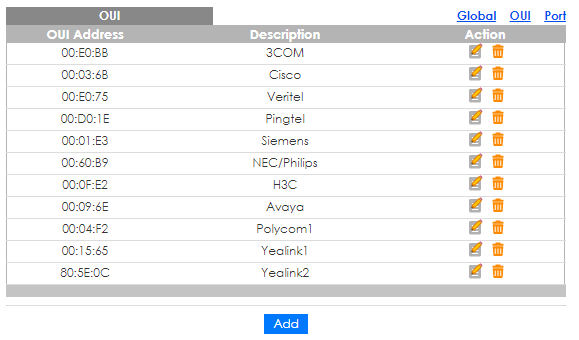
Now we need to add the first 3 bytes of every unique mac address, for every phone connected, to the OUI table, to do so click on the OUI tab.
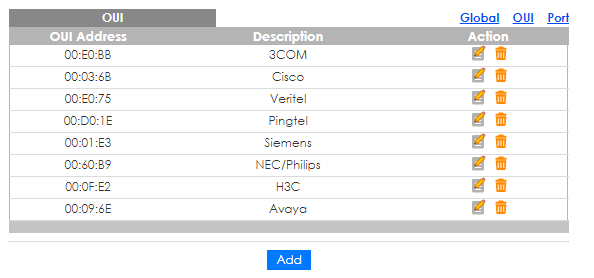
Then click Add to insert a new vendor’s OUI.
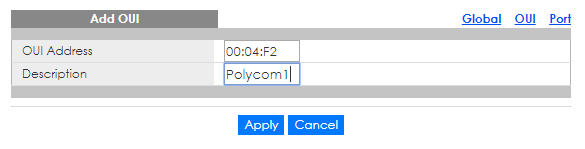
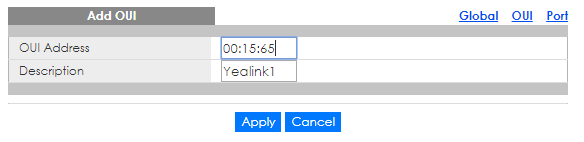
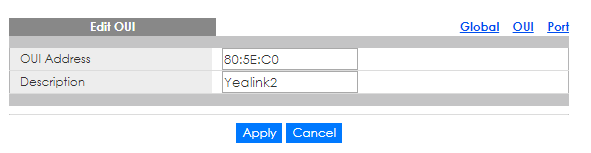
In our example, we will be adding 3 new Vendor OUIs.
| Manufacturer | Model | OUI |
| Polycom1 | VVX 310 | 00:04:F2 |
| Yealink1 | T23G | 00:15:65 |
| Yealink2 | T29G | 80:5E:C0 |
For each OUI enter the first 3 bytes of the MAC, a description, then click the Apply button.
Once all of the OUIs are added your table should look similar to this:
Now to verify that this is working we can look at the MAC Table while in Monitor mode; Monitor->Mac Table
Filter on Vlan 2: Pick Vlan 2 from drop down then click the View button.
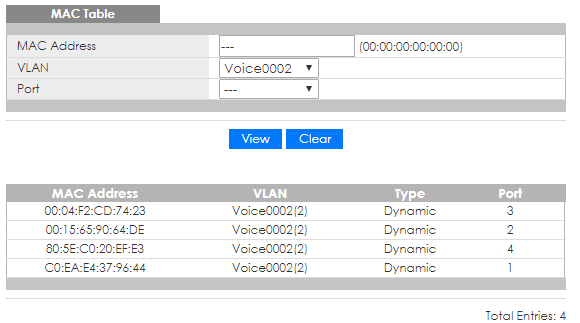
Notice that ports that have phones matching the OUI database are tagged for Vlan 2 traffic.
Now we need to tell the phones the existence of a Voice Vlan via LLDP: Configuration->LLDP

Enable and change the Transmission Interval from the default of 30 seconds to 15 seconds and press the Apply button. The default 30 second interval does not work with certain Polycom phones.
Next we need to create a LLDP-MED Network policy: MED Network Policy

Click on the Add button to create a new policy.
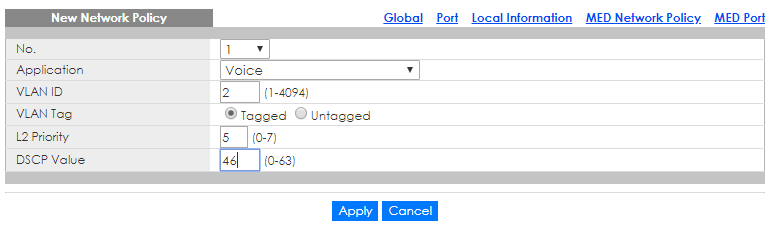
Application is Voice, Vlan is 2 and it is tagged. Set L2 priority to 5 and DSCP value to 46 then click the Apply button.
Next choose which ports to advertise this policy on: MED Port
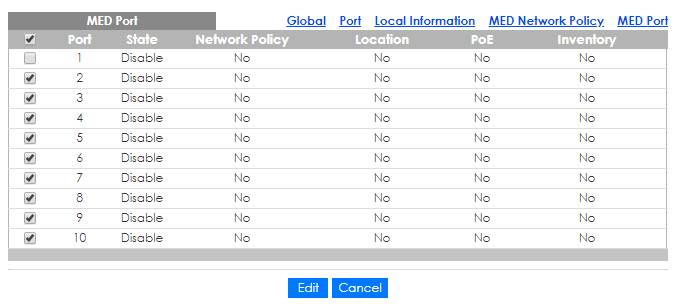
Select all ports except your trunk port and click on the Edit button.
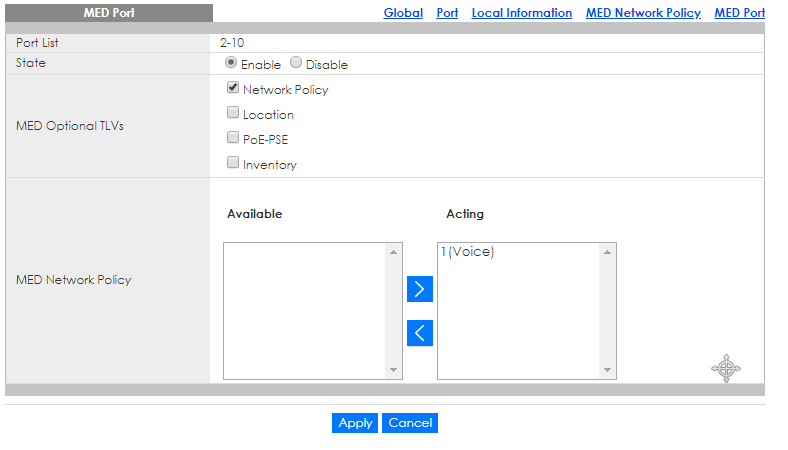
Click on enable, check the Network Policy box then move the Voice Policy from Available to Acting then click the Apply button.
Yealink phones will receive their marching orders via LLDP and switch to Vlan 2, Polycoms may take a reboot. In case you don’t know how to reboot a Polycom hold down the 0,1 and 3 buttons simultaneously.
Take Care,
Mike
XMCpl
26 Feb 2021Well, I do not know if that is going to work for me, however definitely proved helpful for you! Excellent post! http://www.Webmaster.m106.com